

![]()

In this post, I thought I’d take a look at the UIAlertController class, a class introduced by Apple in iOS 8 as a replacement for the traditional UIAlertView and UIActionSheet classes.
As such, the UIAlertController class provides a unified mechanism for displaying alerts across the system that wraps up both modal and popover alert display into a single more flexible interface.
In this post, we’re going to build a sample application that contains two buttons, one that will display an action sheet when tapped and one that will display a modal alert.
During the course of the example application, we’ll look at the different styles of action that can be attached to these alerts and also look at the additional control and flexibility that the UIAlertController brings.
Table of Contents
Setup Example Project
To kick things off, let’s start by creating a new demo application.
Open up Xcode and create a new project using the Single View Application template.
Enter UIAlertController for the project name and select Swift for the language. Leave the device set to Universal and then select the Next button.
When prompted, choose where to save your project (if you’re just experimenting your Desktop is a good option) and then select the Create button.
Setup the User Interface
With the new project created, select the Main.storyboard file in the project browser. Ensure the Object Library is displayed by pressing ⌃⌥⌘ (or by selecting View > Utilities > Show Object Library).
In the search field of the Object Library, enter Button and from the filtered list drag a UIButton instance onto the view positioning the button towards the top of the view using the layout guides.


Once positioned, double-click on the button and set the button title to Show Alert. This will be the button that will, as you might have guessed, display a modal alert when tapped.
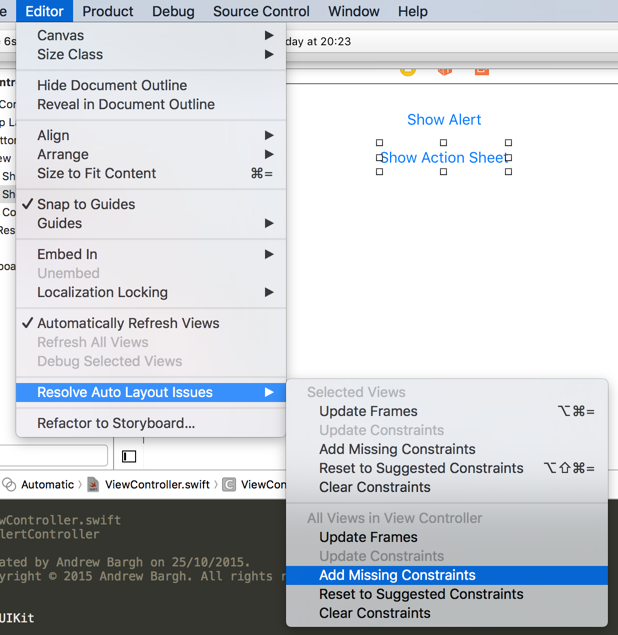
With the button still selected, click on the Resolve Auto Layout Issues button toward the bottom right of the Interface Builder window (I’ve highlighted the button with red circle in the picture below) and then select the Add missing constraints button to setup any missing constraints for the button and make sure it stays in place at runtime.


Next, bring up the assistant editor by pressing on the icon towards the top-right of the Xcode window (or by pressing ⌥⌘

Make sure the Assistant Editor is showing the ViewController.swift file.
With the button selected in the storyboard, press ⌥⌘6 (or select View > Utilities > Show Connections Inspector from the Xcode menus) to bring up the Connections Inspector.
Click and drag from the Touch Up Inside connector in the Connections Inspector down to the code in the assistant editor to create a new IBAction.


Release the mouse and when prompted, enter showAlert for the function name and change the type to UIButton before selecting the Connect button.


With the modal alert button created, we now need to create a second button to display an action sheet. The process is basically identical.
Drag a second button onto the user interface from the Object Library and position it just below the first. Use the guides to line it up centrally in the view before double-clicking on the button and changing its title to Show Action Sheet.
With the button still selected, select the Resolve Auto Layout Issues button (or select Editor > Resolve Auto Layout Issues) and then select Add Missing Constraints. This will add any missing constraints for the new button.

From the Connections Inspector drag from the Touch Up Inside connector down to the ViewController.swift file in the counterpart view. (Press ⌥⌘6 or View > Utilities > Show Connections Inspector if the Connections Inspector is not displayed).
When prompted, enter showActionSheet for the function name, change the type to UIButton and press the Connect button.
UIAlertController
If you’ve ever used the UIAlertView and UIActionSheet classes prior to iOS 8, the interface to the UIAlertController is a little different.
There used to be a lot of quirks and inconsistencies with the UIAlertView and UIActionSheet classes which have been eliminated with the UIAlertController class. Things have also been simplified. We no longer have to use delegate protocols such as the UIActionSheetDelegate or UIAlertViewDelegate protocols to configure the alerts, instead everything is encapsulated within the UIAlertController class itself along with a number of closures we can provide to configure its behaviour.
Let’s dive in then and start looking at what we can actually do with the UIAlertController class. We’ll start with something simple: How to display an action sheet.
Displaying an Action Sheet
If it is still open, close the Assistant Editor and open the Standard Editor by pressing ⌘ViewController.swift file in the project browser to bring the file up in the main Xcode editor.
Change the showActionSheet function to the following. We’ll walk through what it is doing afterwards.
@IBAction func showActionSheet(sender: UIButton) {

        // 1.
        // Create and initialize a UIAlertController instance.
        //
        let alertController = UIAlertController(title: "Your Title",
            message: "Your Message",
            preferredStyle: .ActionSheet)

        // 2.
        // Initialize the actions to show along with the alert.
        //
        let destructiveAction = UIAlertAction(title:"Destroy",
            style: .Destructive) { (action) -> Void in
                print("You selected the Destructive action")
        }

        let defaultAction = UIAlertAction(title:"Default",
            style: .Default) { (action) -> Void in
                print("You selected the Default action")
        }

        let cancelAction = UIAlertAction(title:"Cancel",
            style: .Cancel) { (action) -> Void in
                print("You selected the Cancel action")
        }

        // 3.
        // Tell the alertController about the actions we want it
        // to present.
        //
        alertController.addAction(destructiveAction)
        alertController.addAction(defaultAction)
        alertController.addAction(cancelAction)

        // 4.
        // Present the alert controller and associated actions.
        //
        self.presentViewController(alertController,
            animated: true, completion: nil)
    }
There are four main steps to creating and displaying an action sheet using the UIAlertController class and we’ll walk through it step by step.
First up, we need to create and initialise an instance of the UIAlertController class.
As part of the initialisation, the UIAlertController class accepts a title and message that will be displayed as part of the alert. The third parameter to the initialiser is the preferredStyle. This configures whether the alert controller will be displayed as an action sheet (UIAlertControllerStyle.ActionSheet or .ActionSheet for short) or as a modal alert (UIAlertControllerStyle.Alert or .Alert for short). When configured as an .ActionSheet the views of the UIAlertController are anchored to the bottom of the presenting view. When configured as .Alert they are presented as model alert, centred within the presenting view controller. In this case, I’ve set the preferred style to .ActionSheet as we want to display an action sheet.
Next, we setup the possible actions that the user can take when the UIAlertController is presented. These take the form of instances of the UIAlertAction class.
The initialiser for the UIAlertAction class accepts a title, a style (of type UIAlertActionStyle and an associated closure that will be executed should the action be selected by the user. The title is the title that will be displayed for the action when the alert is displayed on screen. The style parameter configures the style of the action. There are three styles to choose from:
– Default which applies the default style to the button.
– Destructive which indicates that the action may change or delete data.
– Cancel which applies a style indicating that the action cancels things and data will remain unchanged.
It should be noted that you can only ever have a single action configured with the Cancel style in any given alert though. If you try to have more than one, you’ll get a runtime exception.
In this code I’m creating one action with each of the three different styles so you can see what they look like when we run our app.
In addition to the title and style parameter, the initialiser for the UIAlertAction class also accepts a closure that has a UIAlertAction as its single argument. In each case, the statements within the closure will be executed should the user select the associated action. To keep things simple for now, I’ve configured the closures to print a simple statement to the console indicating which action was selected.
With all the UIAlertAction instances created, the next thing we do is add the actions to the alertController we created.
Adding actions to the UIAlertController is done in a specific order as the order we add the actions governs the order that they will be displayed when presented. The only exceptions to this is are that any action configured with the .Cancel style, will be displayed last, regardless of the order in which it was added and the The Apple Human Interface Guidelines also recommends that you add any actions with the .Destructive style first so try to keep this in mind when you’re adding actions of your own.
That’s pretty much it though. With all the alert actions added, all that is left is to display the alert itself.
To do this we use the the presentViewController(_:animated:completion:) method, passing in the alert controller instance we created. We also pass in true to animate presentation of the alert controller and nil for the third argument as we don’t need to be informed when the animation completes.
At this point you should be able to run the app in the simulator and see what it looks like.


At this point, only the Show Action Sheet button will work. Tap on the button and you should see the alert displayed as an action sheet along with the various actions and their styles. If at this point you tap on any of the actions, the action sheet will disappear and you should see a message appear in the console window indicating which action you selected.
Troubleshooting the Action Sheet
If at this point you don’t see the same output as me there are a couple of things you might need to check.
Firstly, go back through the code and make sure that you’ve covered all the steps. The most likely thing to have happen if things aren’t working is that you’ve missed connecting the button in the storyboard up to the associated IBAction code in the ViewController.swift file. Go back and check that the connection is correct by selecting the button in the storyboard and checking the connections for the button in the Connections Inspector. Make sure the Touch Up Inside event is wired up to the showActionSheet method in the ViewController.swift file. If you’re still struggling, drop me a message in the comment form below.
Next we’ll look at how to display a modal alert.
Displaying an Alert
The code to display a modal alert with the UIAlertController is almost identical to that of displaying an action sheet. The only real difference is the fact that we set the preferredStyle parameter of the AlertController to be .ActionSheet instead of .Alert. Change the showAlert function to the following:
@IBAction func showAlert(sender: UIButton) {

        // 5.
        // Create and initialize a UIAlertController instance.
        //
        let alertController = UIAlertController(title: "Login",
            message: "Enter your details",
            preferredStyle: .Alert)

        // 6.
        // Initialize the actions to show along with the alert.
        //
        let submitAction = UIAlertAction(title:"Submit",
            style: .Default) { (action) -> Void in
                print("You selected the submit action.")
        }

        let cancelAction = UIAlertAction(title:"Cancel",
            style: .Cancel) { (action) -> Void in
                print("You selected the Cancel action")
        }

        // 7.
        // Tell the alertController about the actions we want it to present.
        //
        alertController.addAction(submitAction)
        alertController.addAction(cancelAction)

        // 8.
        // Present the alert controller and associated actions.
        //
        self.presentViewController(alertController,
            animated: true, completion: nil)
    }
As you can see, the code’s a little different (we’re going to extend it in the next section) but the general structure is identical to what we saw with the action sheet. In this case, we create a UIAlertController instance initialising it with a title and message but set the preferred style to .Alert rather than .ActionSheet. In the next couple of lines, we then create two actions, a Submit action and a Cancel action which we then add to the UIAlertController instance. In the final line, we then present our UIAlertController instance.
At this point, you can re-run the app. This time the Show Alert button should be working so if you tap the Show Alert button you should see the UIAlertController displayed as a modal alert.
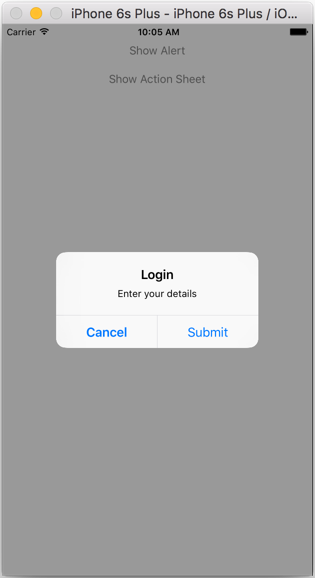

As with the action sheet, tapping on any of the buttons will dismiss the alert and should display a message in the console window indicating which of the actions you tapped.
Adding Text Fields
Now, this is where things get interesting. The UIAlertController gives us some additional features beyond the original UIAlertView that you might be used to. One of these features is the ability to add multiple text fields to the UIAlertController that will be displayed within the alert when it is presented. When displayed, the text fields are stacked and displayed in the order that they are added to the UIAlertController.
There is a word of caution here though. These additional text fields are supported only when the UIAlertController style is set to .Alert. If you try to add text fields to the UIAlertController when its style is set to .ActionSheet you’ll get a runtime exception. You’ve been warned.
Let’s see if we can extend our modal alert functionality to add a couple of text fields.
Back in Xcode, add the following code to the showAlert function just below where we created the cancelAction.
// 9.
// Add text fields to the alert and configure.
//
alertController.addTextFieldWithConfigurationHandler { (textField) -> Void in
      textField.placeholder = "Username"
}

alertController.addTextFieldWithConfigurationHandler { (textField) -> Void in
      textField.placeholder = "Password"
      textField.secureTextEntry = true
}
In this code, I’m creating two text fields using the addTextFieldWithConfigurationHandler:_ function on the UIAlertController.
The addTextFieldWithConfigurationHandler:_ method accepts a single parameter which is a closure that accepts a single UITextField parameter. The closure will be called by the UIAlertController once it has created a UITextField instance on our behalf and within the closure we get a chance to configure the properties of the text field.
For the first text field, the one that will accept a username, we do just that, simply setting the placeholder text for the text field. We also do this for the second text field, but in this case we also configure the text field for secure text entry as this field will be used to capture the users password.
With the text fields configured, next let’s modify the closure for the submitAction to print out the contents of the two text fields when the user taps the submit button.
Add the following code to the submitAction closure, just below the existing print statement.
// 10.
// Print the text from the username and password
// text fields when the submit button is pressed.
//
if let usernameTextField = alertController.textFields?.first,
    let username = usernameTextField.text,
    let passwordTextField = alertController.textFields?.last,
    let password = passwordTextField.text {
    print("Username: \(username), Password: \(password)")
}
At first glance this code might look a bit daunting but lets walk through it step by step.
What we’re primarily doing here is making use of Swifts ability to bind multiple optionals in a single line. Any text fields that have been added to the UIAlertController instance are held as an optional array textFields are held in the same order as were added to the UIAlertController. The property is an optional however as no text fields may have been added so we first need to unwrap the array to access its contents.
As we added the username text field to the UIAlertController first, we initially unwrap the textfields property and access the first text field in the array optionally binding it to the usernameTextField constant. We then use that in the second binding to access the text in from that text field, binding that text to a second constant username. With the content of the first text field extracted, we then repeat this process in the next two bindings extracting the password text field from the textFields property followed by the text from that text field. In this case we bind them to the passwordTextField and password constants respectively. With everything extracted successfully, within the if statement, we simply print the username and password to the console using the print function.
At this point we can re-run the application. This time when you tap the Show Alert button, you should see a modal alert containing the two text fields we just created.
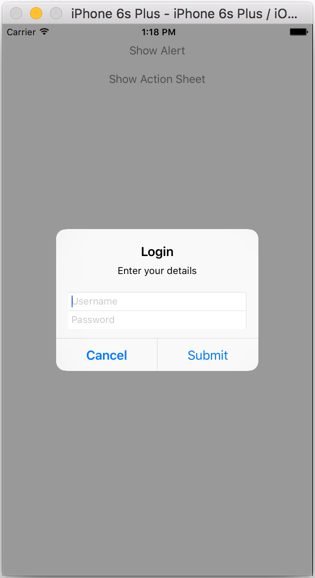
Enter some text in the username and password fields. Notice that the password field has the standard secure text entry format due to the configuration we setup within the closure.
As previously, if you tap the Submit action, the alert will disappear but this time the username and password you entered will be printed in the console.
This is great, but it doesn’t really make sense to be able to submit an empty username and password though. Ideally, we’d only enable the Submit action once the user has entered at least some text for the username and password. Let’s see if we can fix that.
Conditionally Enabling Actions
So what do we need to do? Well first, we need to start off with the Submit action being disabled when the alert is first presented to the user. To do this, we can simply set the enabled property of the Submit action to false.
Add the following code to the showAlert function just after where we created the two actions.
// 11.
// Initially disable the submit action.  We'll enable it later
// when the user has entered text in both a username and password
// text fields.
//
submitAction.enabled = false
Next, we’ll further modify the two closures associated with the addTextFieldWithConfigurationHandler functions.
Here, we’ll set the text fields to call a new callback function (alertTextFieldDidChange:) whenever the text in either of the two text fields changes (the EditingChanged event).
Add the following code to the end of each of the two closures:
// 12.
// Add a callback to the `alertTextFieldDidChange:` function that
// is triggered when the text in the text field changes.
//
textField.addTarget(self, action: "alertTextFieldDidChange:",
    forControlEvents: .EditingChanged)
With the callbacks setup, the next thing to do is add the alertTextFieldDidChange: callback function otherwise the app will crash. Add the following new function to the ViewController class:
// 14.
// Check the text in both the username and password text fields.  If they both have
// some text, enable the submit button otherwise disable it.
//
func alertTextFieldDidChange(sender : UITextField) {

    guard let alertController = self.presentedViewController as? UIAlertController,
    let username = alertController.textFields?.first?.text,
    let password = alertController.textFields?.last?.text,
    let submitAction = alertController.actions.first else {
        return
    }

    submitAction.enabled = username.characters.count > 0 &&
        password.characters.count > 0
}
Lets have a look at what it’s doing.
First I’m using the new guard statement available in Swift 2.0. The guard condition allows us to check for certain conditions and forces the function to return if the conditions are not met. In this case, I’m also combining it with the multi-optional-binding we saw earlier. When we combine the guard statement with optional binding in this way any of the bindings that were successful are available throughout the remainder of the scope in which the guard statement was called but after the closing brace of the guard statement. In this case, were doing this with four different constants.
First we get hold of the UIAlertController instance binding this to a new local constant called alertController. If that binding was successful we then use optional chaining to access the username and password text fields for the alert controller and extract their associated text, optionally binding the values to the local constants username and password respectively.
As I mentioned previously the text fields held in a local array property textfields on UIActionController instance and are stored in the same order as when we added them so using that fact we can use the first and last properties of the array to get hold of the username and password text fields respectively.
If these were also successful, we then move onto the final binding, where we bind the Submit action from the alert controllers actions array to a new local constant called submitAction. As with the text fields, the actions are held in an array in the order that they were added so we can simply use the first property of the array to get hold of the Submit action.
Wow. That was a lot of bindings!
Anyway, if any of the bindings fail, within the body of the guard statement, we return as per the requirements of the guard statement. If however, all these bindings went well we set the enabled state of the Submit action. We do this by setting it to true if both the username and password entered by the user contain at least one character and false otherwise.
Re-run the application and check out the new functionality.
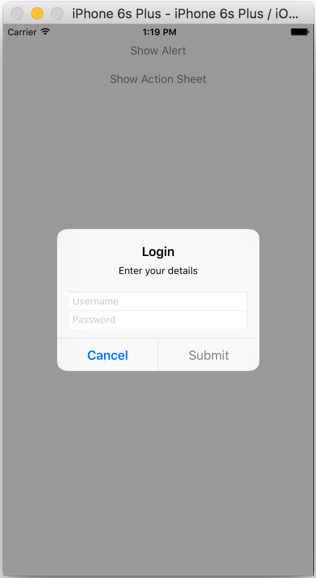

If you run the app now, you should see the Submit action start off disabled. If you then enter some text you should notice that the Submit action is only enabled if both the username and password fields contain some text. Great job! Before I wrap up though, there’s one final thing I want to cover.
Programatically Dismissing the UIAlertController
The final thing I wanted to do before closing out this article is look at how we can dismiss an UIAlertController instance programatically. Typically, the UIAlertController instance is dismissed automatically when the user taps one of the actions, you’ve seen this already, but there are some scenarios such as when your application moves into the background that require us to dismiss the UIAlertController instance programatically rather than having it dismissed by the user. The good news is that this is relatively simple to do.
Lets start out by getting the ViewController to observe when the application moves into the background. We can do this by registering with the NSNotificationCenter singleton and a observing the UIApplicationDidEnterBackground notification.
In the viewDidLoad function of the ViewController class add the following code:
// 15.
// Register the view controller as an observer of the UIApplicationDidEnterBackgroundNotification
// event and hook it up to the didEnterBackground: callback method.
//
NSNotificationCenter.defaultCenter().addObserver(self,
    selector: "didEnterBackground:",
    name: UIApplicationDidEnterBackgroundNotification,
    object: nil)
All this does is setup the ViewController class as an observer of the UIApplicationDidEnterBackground event, and sets it up to call the didEnterBackground: function on the ViewController when the event occurs.
Whilst we’re here, we had also better de-register ourselves as well.
The best place to do this is in the deinit function for the class.
Add the following new code below the viewDidLoad function:
deinit {
    // perform the deinitialization

    // 16.
    // Remove the view controller as an observer of the UIApplicationDidEnterBackgroundNotification
    // event.
    //
    NSNotificationCenter.defaultCenter().removeObserver(self)
}
All we do here is call the removeObserver(observer:) function on the default NSNotificationCenter instance passing in the ViewController instance for the observer parameter. This removes the ViewController instance as an observer from all notifications posted by the notification centre.
So we’ve set things up to call the didEnterBackground function when the notification occurs, the next thing we’d better do is write the callback function.
Add the following new function to the ViewController class.
// 17.
// The callback method that is called when the UIApplicationDidEnterBackgroundNotification
// notification is posted. When called, programatically dismiss the UIAlertController if it
// has been presented.
//
func didEnterBackground(notification : NSNotification) {
    self.presentedViewController?.dismissViewControllerAnimated(false, completion: nil)
}
As you can see, the code is only a single line. All it does is call the dismissViewControllerAnimated(flag:completion:) function on the presented view controller (if it is presented). In this case the presented view controller is our UIViewController instance.
That’s all there is to it.
All that’s left to do then is to check out our new functionality.
Run up the application again and tap the Show Alert button. As expected, you should see the UIAlertController displayed as an alert. This time though, instead of entering text or selecting either of the actions, press the home button (⇧⌘H or Hardware > Home if your running in the simulator). This will put the app into the background. As a final step, bring the app back to the foreground by tapping on its icon. You should see that the UIAlertController instance has been dismissed. Mission accomplished!
Well done if you made it this far! It’s a much longer post than I expected but it’s covered most of the functionality of UIAlertController.
If you need additional information, check out Apple documentation on the UIAlertController and UIAlertAction classes.